These are a couple of simple utilities I put together for my personal use,
but which might be of some value for somebody else as well.
Thery're written in different languages, and their style varies somewhat as
my preferences changed by time.
For a first attempt, here are three of them, now all written in python,
although they started out being put together with different helper programs.
This is still reflected by the use of one or another external utility.
As I personally prefer the GTK2 appearance much over that of GTK3, they still
have to rely on Python2 and the "gtk" module available for it.
Sadly, there is no GTK2 module around for Python3, so going to the current Python
version forces one to use GTK3 with its - in my opinion - clumsy and clunky widgets,
where I dislike particularly the huge, space wasting, spin button design besides its
generally much bigger control elements which are mainly wasting screen area.
But as the programming interface hasn't changed a lot from GTK2 for GTK3, it isn't
too difficult to port them over. So now there is a GTK3 version for Python 3 for each
of them.
To download a zip archive with a working sample, just click on the picture shown.
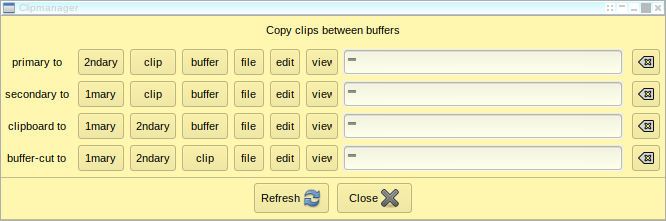
1 - The Clip Manager
This is how it looks:
And this is the GTK3 version:
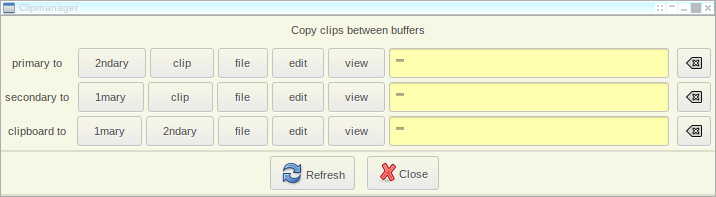
The text fields in the window show the beginnings of the content of all areas of the X11
(or rather GTK) clip buffer (or two consecutive double quotes, '""', for an empty buffer).
There are 4 of them:
- The Primary Buffer
- The Secondary Buffer
- The Clipboard Buffer
- An Application Buffer ¹)
¹) As GTK3 doesn't provide such a thing, the 4th buffer is not available there.
Next to these copy buttons are three more buttons:
- file
- edit
- view
- The "file" button copies the corresponding buffer's contents to disk into a file named "~/{clip buffer name}.clip" in the user's home directory. (The path and name can be modified by changing their definitions in the program source.)
- The "edit" button calls either the system "VISUAL" editor, the editor specified by the "EDITOR" environment variable, or, lacking these, an editor specified within the program's definition area. (The editor to be used must be callable from an X11 application, though. Failing this will cause a window manager error or something like this.)
- The "view" button displays the contents of the pertaining buffer in a text field belonging to the clip manager program. It can not be manipulated any further.
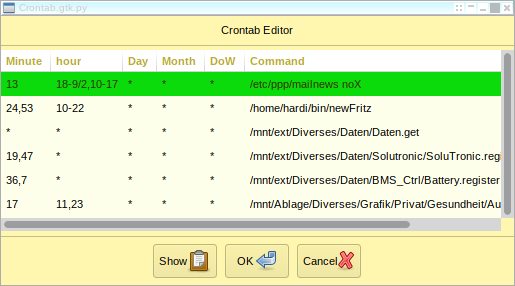
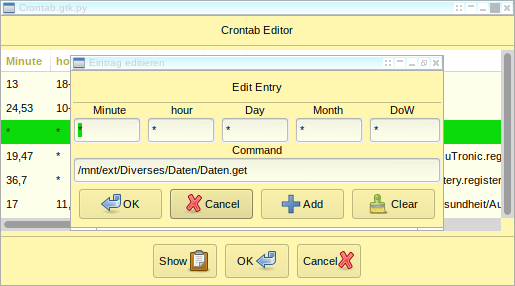
2 - The Crontab Editor
This is how it looks:
And this is the GTK3 version:
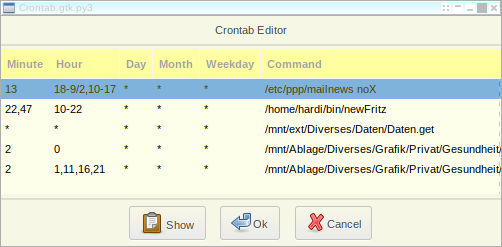
This is the basic display the crontab editor presents initially. There ae no comments or empty
lines, just the active entries are shown. Ir nontheless does keep all the other stuff intact.
To modify an entry, double click on it to display the editor dialog window (overlying the base display
window):
The GTK3 version:
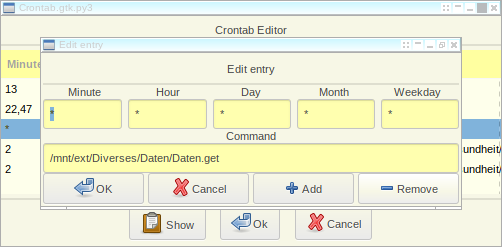
This dialog presents all fields, "nicely" separated, for modification. All fields are handled as text
only because of the rather complex syntax that some cron daemons understand. That way, you can
use all of your cron daemon's sophistication.
The functions of the entry fields is shown above each one. The upper row of fields containes the five
time specitications: .
- Minute
- Hour
- Day of month
- Month
- day of week< (Weekday)/li>
As usual, the "OK" button accepts the currently displayed values, and if something was modified, puts it into the corresponding table entry and the dialog is closed. If nothing was changed, or the "Cancel" button was clicked (or the "Esc" key pressed), the dialog simply closes and any modifications done in the dialog will be lost, of course.
Additionally, there are two more buttons to modify the crontab contents:
- Add
- Clear (or Remove for GTK3)
The "Clear" (or "Remove") button serves to remove the current entry from the list.
"Add" and "Clear" always set the "modified" flag.
Finally, the crontab itself will be modified on activating the "OK" button on the base window, but only if some entry was modified or the "modified" flag was set otherwise. If no modification was made or the "Cancel" button was clicked, no further action will be taken and the current crontab will stay in force.
The third button named "Show" displays the complete current contents of the crontab in the format it would be written for evaluation by thecron daemon for verification.
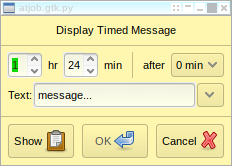
3 - The At Reminder
This is how it looks:
And this is the GTK3 version:
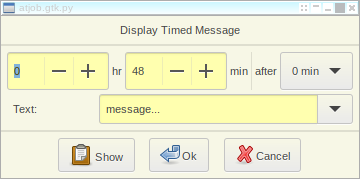
This utility was created to remind me - the user - of actions required to be done at fixed times even
during other attention capturing activities. It simply allows the specification of a time of day and
select one of a pre-defined set of actions. This list is specified within the program and can be modified
and extended as needed.
To perform its intended function, the program creates a small script containing the selected message
text. The script template is defined within the program and can be modified to suite the user's needs.
This script is then passed to the "at" command, which will execute it at the set time.
As set it up in the provided version, the script plays a sound to evoke attention, and shows the message
on the screen using the Xdialog program. The example set up does just that, using the addtional external
script "play_sound" in the directory where the program resides.
By modifying and extending this embedded script, it should be possible to perform whatever action the
user wants. The place where the message text will be inserted has to be marked with the string "{0}",
and in addition one can insert the program's storage path with the string "{1}", e.g. to execute an
external script to play an alerting sound.
In addition, the "Show" button will display a list of pending reminder jobs (at jobs), if any
After execution by the "at" program, the message script will be automatically removed.
Cautionary remark: There is no provision to check the time given. This means that specifying
a time before the current time may cause the message to appear on the following day at the
time given, or never.
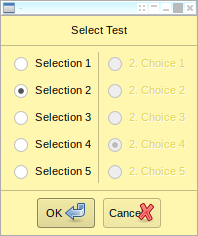
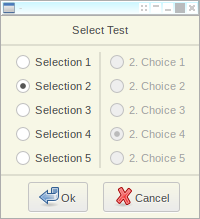
4 - Module General Selector
This is not a stand alone working application!
There is, though, a small sample script included to demonstrate its use.
This is how it looks:
And this is the GTK3 version:
The "GeneralSelector.py" (and its GTK3 equivalent, "GeneralSelector3.py") provide a means to simply select
a couple entries from some text lists passed to it as parameters. The main function "showSelection" cares
about all the internals. It can be used from within a Python program, of course, but it's also possible
to call it from any script language (a Linux shell, e.g.) through a small interface function like that
shown in the "SelectCall.sh" sample script. This interface function is passed to the Python interpreter
as a string, specifying the required parameters. These can, of course, also be dynamically constructed
by the calling script and inserted into the interface function string.
There are three parameters to the interface function:
| Name | Description |
|---|---|
| Title | The title string appearing at top of the selector window |
| Selection | A Python formatted list of some lists of selectable values |
| Response | Another list of formatting text surrounding the output |
The most complicated of these parameters is the "Selection":
It consists of several sub-lists, all enclosed in square brackets, specifying the strings the user can select from plus an additional preselection string, and one of the values "True" or "False" to enable or disable the sub-list it belongs to. This allows an elaborate selection mechanism to occasionally restrict the available selections, if neccessary.
The "Response" list is used as follows:
To construct the result string, the first entry ist prepended to the sequence of selector values.
Then, the selected values are output one by one, separated by each of the corresponding "Response" entries in series. If there are more selection fields than response entries, the last one will be repeated for the remaining selections.
Finally, after the last selected value, andif there's a "Response" entry not yet used, the last value in the "Response" list will be appendedd to the output.
That way you can construct quite complex output strings that can serve as input to other functions of your application or even be directly used as commands for a script language program.